2024. 6. 27. 21:11ㆍMobile Programming
포스팅 소개
종강 후 여유가 생겨서, 모바일프로그래밍이라는 전공 과목에서 4주간 진행했던 팀 프로젝트를 정리해보려고 한다. 안드로이드 스튜디오와 코틀린을 사용하여 앱을 개발하였다. 웹 사이트 개발과 비슷한 기능을 앱에서 만들 때, 방식이나 구조가 비슷해서 도움이 되기도 했고, 반대로 새롭게 익혀야하는 것도 많았다. 안드로이드 스튜디오는 코드에 사용되는 라이브러리 버전 문제나 에뮬레이터 에러 등 까다로운 부분들이 있어서 익숙해지는데 시간이 조금 걸리기도 했다.
내가 구현한 기능들은 다른 앱을 만들 때도 반복적으로 사용되므로 잘 정리해두면, 다음에는 개발 시간을 단축할 수도 있고 부족했던 부분을 보완할 수도 있을 것이라고 생각한다. 우리 팀의 주제는 '교내 동아리 정보 앱 개발' 이다. 기획 1명, 개발 3명으로 정하고, 각자 세부 역할도 나누었다. 초기 제안서에서 내 역할은 회원가입, 로그인, 설정 페이지 관련 기능이었다. 그리고 아래 순서로 프로젝트를 진행하였다.
제안서 작성 및 역할 분배 → 개발 → 앱 배포 → 최종보고서, 발표, 팀 활동 평가
이제 내가 구현했던 부분들을 구체적으로 정리해보겠다.
프로젝트 아키텍쳐 설계
DAO, Repository, ViewModel, UI로 구성 요소를 모듈화함으로써, 유지 보수를 용이하게 했다. 여러 개의 화면들은 NavHost와 NavRoutes에 등록하여 편리하게 이동한다. NoSQL 기반의 Firebase Realtime Database를 연동했으며, DAO를 통해 데이터에 접근한다. AWS EC2 서버는 API를 통하여 사용자 인증을 위한 JWT 발급 및 검증을 수행한다. 또한, 관리자용 기능을 따로 구현하지 않았기 때문에, Cron Job을 통해 DB에 공지사항을 자동으로 추가하고 공지사항 등록 및 알림 기능을 테스트했다.

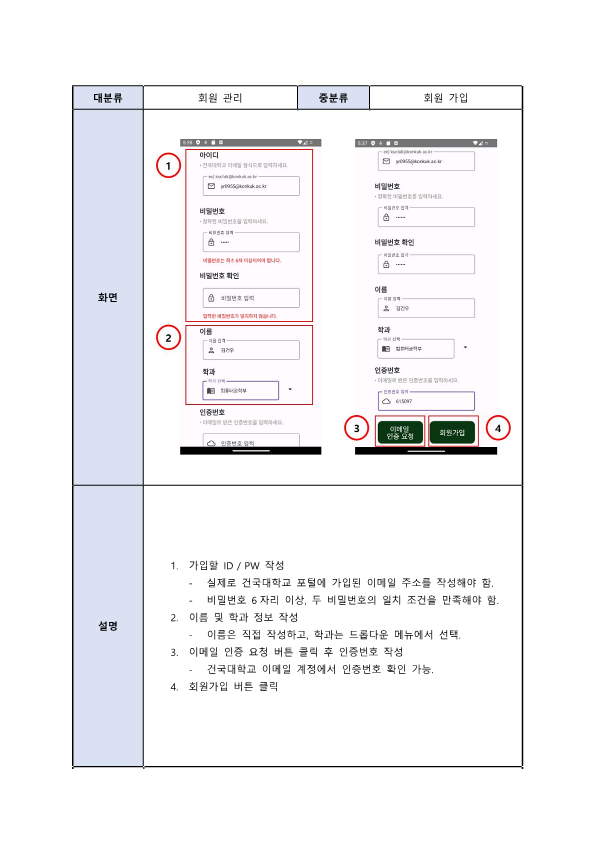
회원 가입

- OutlinedTextField와 Icon을 주로 사용하여 신규 가입자 정보를 입력 받도록 했음.
- 아이디 입력란에 텍스트 입력시 뒷부분은 학교 이메일이 되도록 고정함.
OutlinedTextField(
    value = userId?:"",
    onValueChange = {
        if (!it.endsWith("@konkuk.ac.kr")) {
            userId = it.removeSuffix("@konkuk.ac.kr") + "@konkuk.ac.kr"
        } else {
            userId = it
        }
    },
    label = { Text("ex) kuclub@konkuk.ac.kr") },
    leadingIcon = {
        Icon(
            imageVector = ImageVector.vectorResource(id = R.drawable.baseline_mail_outline_24),
            contentDescription = "id_icon"
        )
    },
    keyboardOptions = KeyboardOptions(imeAction = ImeAction.Next),
    modifier = Modifier.padding(10.dp)
)- 정규식을 이용해서 비밀번호 입력 조건을 만들고, 만족하지 않으면 회원가입 버튼 클릭시 토스트 메시지를 띄움.
val passwordRegex = Regex("^.{6,}\$")if (!passwordRegex.matches(userPasswd)) {
Text("비밀번호는 최소 6자 이상이어야 합니다.", color = Color.Red,
modifier = Modifier.padding(horizontal = 10.dp))
}- 두 번 입력한 비밀번호 간의 일치 여부를 확인하고, 불일치 하면 회원가입 버튼 클릭시 토스트 메시지를 띄움.
if (userPasswd != userPasswdCheck) {
    Text("입력한 비밀번호가 일치하지 않습니다.", color = Color.Red,
        modifier = Modifier.padding(horizontal = 10.dp))
}
Button(
onClick = {
if (!passwordRegex.matches(userPasswd)) {
Toast.makeText(context, "비밀번호는 최소 6자 이상이어야 합니다.", Toast.LENGTH_SHORT).show()
}
else if (userPasswd != userPasswdCheck) {
Toast.makeText(context, "비밀번호가 서로 일치하지 않습니다.", Toast.LENGTH_SHORT).show()
}
else if (userAuthNum == randomNum) {
navUserViewModel.insertUser(user)
navController.navigate(NavRoutes.RegisterSuccess.route)
} else {
Toast.makeText(context, "인증번호가 일치하지 않습니다.", Toast.LENGTH_SHORT).show()
}
},
modifier = Modifier
.width(150.dp)
.height(85.dp)
.padding(10.dp),
colors = ButtonDefaults.buttonColors(
containerColor = Color(0xFF0A3711),
contentColor = Color.White
),
shape = MaterialTheme.shapes.medium
) {
Text("회원가입", fontSize = 20.sp)
}- DropdownMenu로 학과를 선택함.
DropdownMenu(
    expanded = expanded,
    onDismissRequest = { expanded = false },
    modifier = Modifier
        .width(200.dp)
        .fillMaxWidth()
        .heightIn(max = 200.dp)
) {
    listOf("컴퓨터공학부", "국어국문학과", "영어영문학과", "중어중문학과", "철학과", "사학과",
        "지리학과", "미디어커뮤니케이션학과", "문화콘텐츠학과", "수학과", "물리학과", "화학과",
        "건축학부", "사회환경공학부", "기계항공공학부", "전기전자공학부", "화학공학부",
        "산업공학과", "생물공학과").forEach { major ->
        DropdownMenuItem(
            text = { Text(major) },
            onClick = {
                selectedMajor = major
                userMajor = major
                expanded = false
            }
        )
    }
}- 이메일 인증 요청 버튼 클릭시 GMailSender를 통해 앱 공식 메일에서 랜덤 인증번호를 학교 메일로 전송함. 사용자가 입력한 인증번호를 대조하여, 불일치하면 회원가입 버튼 클릭시 토스트 메시지를 띄움.
class GMailSender : Authenticator() {
    // 보내는 사람 이메일과 비밀번호
    val fromEmail = ""  // 입력
    val password = ""  // 입력

    // 보내는 사람 계정 확인
    override fun getPasswordAuthentication(): PasswordAuthentication {
        return PasswordAuthentication(fromEmail, password)
    }

    // 메일 보내기
    fun sendEmail(toEmail: String, randomNum:String) {
        CoroutineScope(Dispatchers.IO).launch {
            val props = Properties()
            props.setProperty("mail.transport.protocol", "smtp")
            props.setProperty("mail.host", "smtp.gmail.com")
            props.put("mail.smtp.auth", "true")
            props.put("mail.smtp.port", "465")
            props.put("mail.smtp.socketFactory.port", "465")
            props.put("mail.smtp.socketFactory.class", "javax.net.ssl.SSLSocketFactory")
            props.put("mail.smtp.socketFactory.fallback", "false")
            props.setProperty("mail.smtp.quitwait", "false")

            // 구글에서 지원하는 smtp 정보를 받아와 MimeMessage 객체에 전달
            val session = Session.getDefaultInstance(props, this@GMailSender)

            // 메시지 객체 만들기
            val message = MimeMessage(session)
            message.sender = InternetAddress(fromEmail)
            message.addRecipient(Message.RecipientType.TO, InternetAddress(toEmail))
            message.subject = "[KU 동아리 앱] 인증번호를 확인해주세요."
            message.setText("인증번호: " + randomNum)

            // 전송
            Transport.send(message)
        }
    }
}- 비밀번호나 인증번호 조건 등을 모두 만족하면, DB에 사용자 정보가 저장되고 회원가입 완료 페이지로 이동함.
JWT를 이용한 자동 로그인
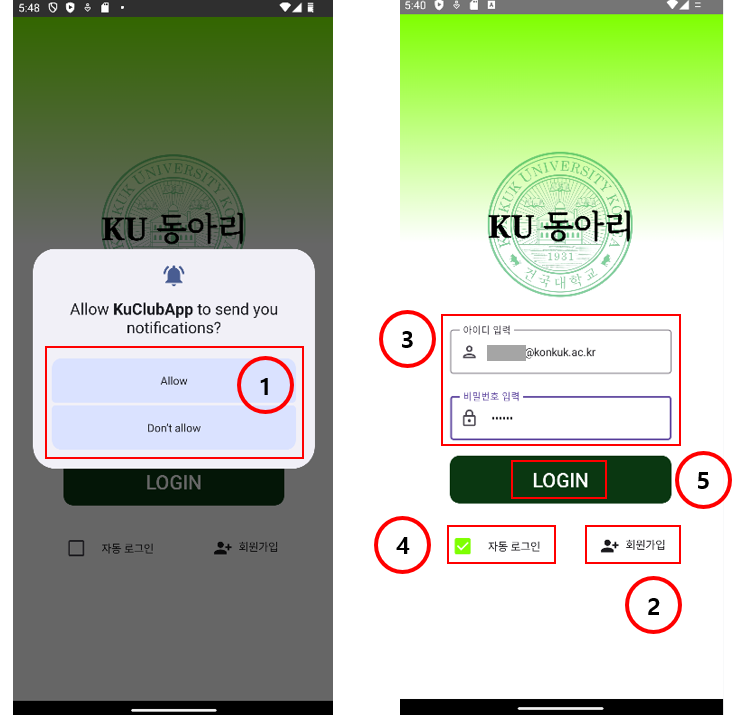
앱 알림 권한 초기 설정
- AndroidManifest.xml 파일에 POST_NOTIFICATION 퍼미션 설정을 추가하고, 앱 실행 시 첫 화면에 알림 런타임 권한 설정 다이얼로그를 띄움.
    <uses-permission android:name="android.permission.INTERNET" />
    <uses-permission android:name="android.permission.ACCESS_NETWORK_STATE" />
    <uses-permission android:name="android.permission.POST_NOTIFICATIONS" />
    <uses-permission android:name="android.permission.WRITE_SETTINGS"
        tools:ignore="ProtectedPermissions" />

    <application (생략)
val context = LocalContext.current
val permissionState =
rememberPermissionState(permission = Manifest.permission.POST_NOTIFICATIONS)
var showDialog by remember {
mutableStateOf(false)
}
val requestPermissionLauncher
= rememberLauncherForActivityResult(contract = ActivityResultContracts.RequestPermission()) { isGranted ->
if (isGranted)
Toast.makeText(context, "알림 권한이 허용되었습니다.", Toast.LENGTH_SHORT).show()
else
if (!permissionState.status.shouldShowRationale)
showDialog = true
}
LaunchedEffect(key1 = permissionState) {
if(!permissionState.status.isGranted && !permissionState.status.shouldShowRationale)
requestPermissionLauncher.launch(android.Manifest.permission.POST_NOTIFICATIONS)
}
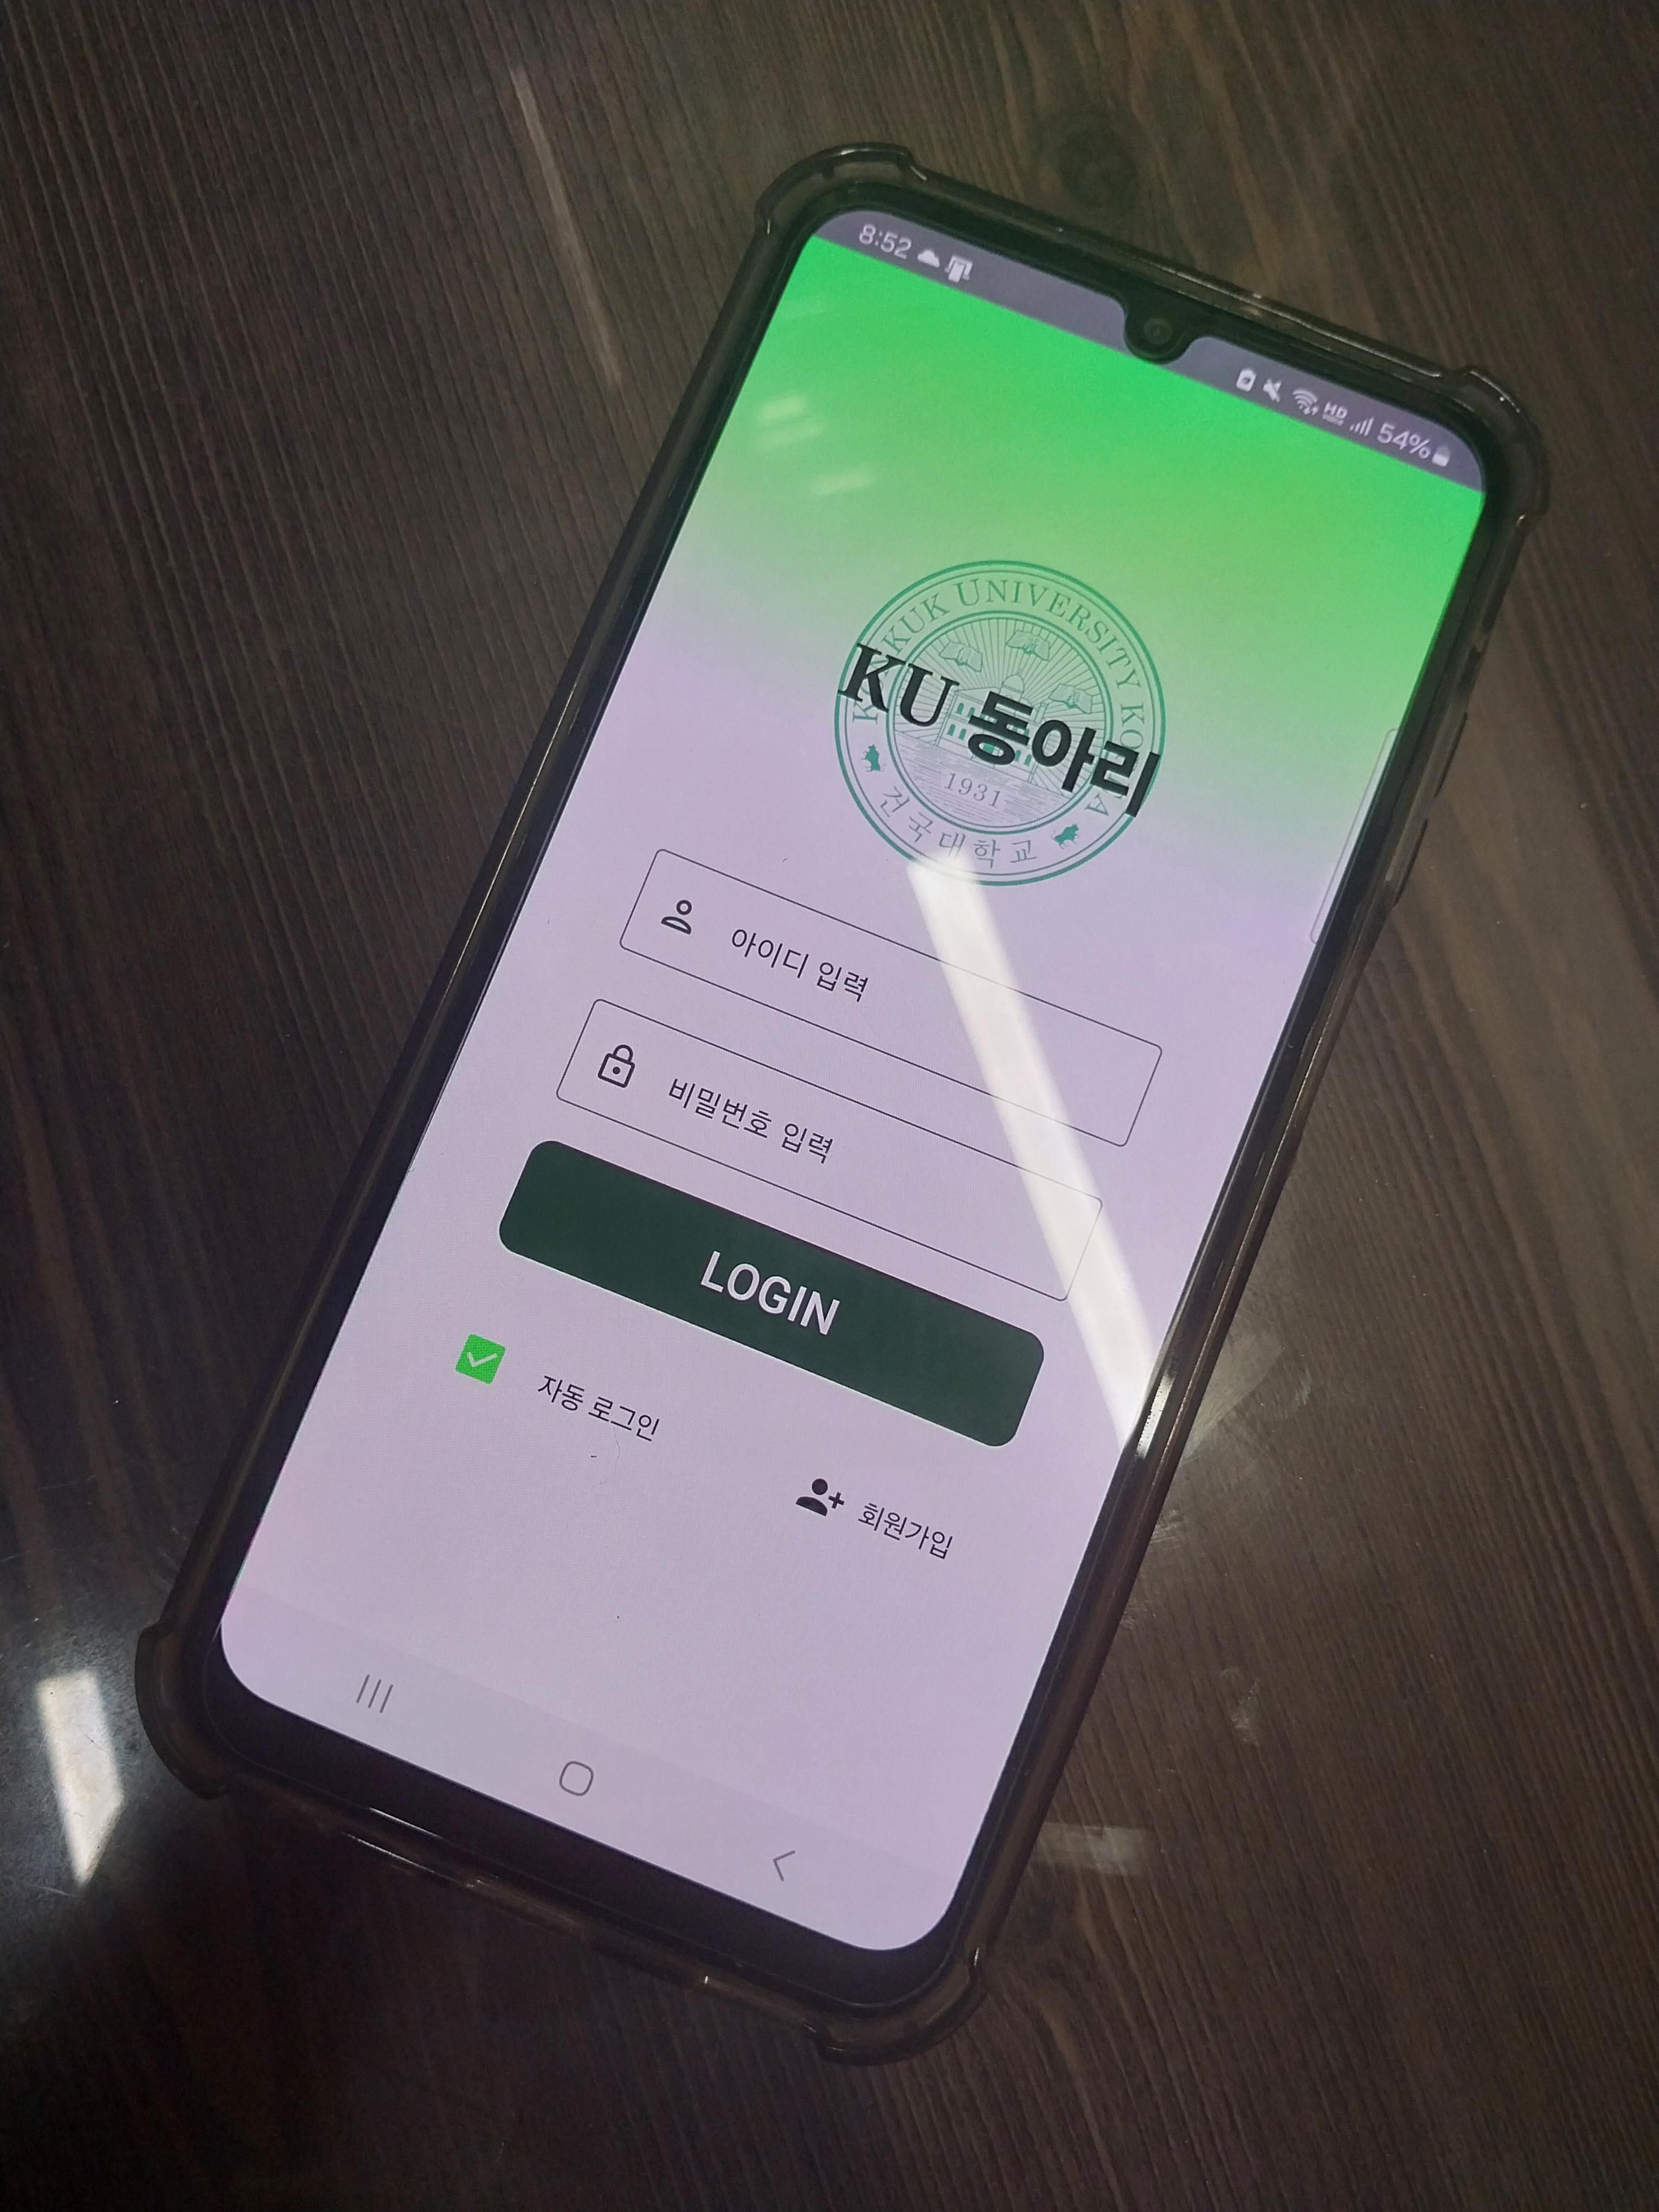
일반 로그인 및 자동 로그인
- 자동 로그인 체크박스를 해제한 상태로 로그인하면 앱 종료시 다시 ID/PW를 입력해야 함. 자동 로그인을 체크한 상태로 로그인하면 Json Web Token(JWT)이 DataStore에 저장되므로 앱 종료 후 재실행해도 자동으로 로그인 됨.
private val Context.dataStore by preferencesDataStore(name = "settings")

object DataStoreManager {
    private val TOKEN_KEY = stringPreferencesKey("key_token")
    private val AUTO_LOGIN_KEY = booleanPreferencesKey("key_auto_login")

    suspend fun saveToken(context: Context, token: String) {
        context.dataStore.edit { settings ->
            settings[TOKEN_KEY] = token
        }
    }

    fun getToken(context: Context): Flow<String?> {
        return context.dataStore.data.map { settings ->
            settings[TOKEN_KEY]
        }
    }

    suspend fun saveAutoLoginStatus(context: Context, isChecked: Boolean) {
        context.dataStore.edit { settings ->
            settings[AUTO_LOGIN_KEY] = isChecked
        }
    }

    fun getAutoLoginStatus(context: Context): Flow<Boolean?> {
        return context.dataStore.data.map { settings ->
            settings[AUTO_LOGIN_KEY]
        }
    }

    suspend fun deleteToken(context: Context) {
        context.dataStore.edit { settings ->
            settings.remove(TOKEN_KEY)
        }
    }

}- 일반적으로 JWT는 인증에 필요한 정보들을 암호화시킨 JSON 토큰으로서, JWT 를 HTTP 헤더에 실어 서버가 클라이언트를 식별하는 방식으로 사용됨. Header, Payload, Signature로 구성되어 인증 신뢰성을 가지며, 유효한 토큰만 있으면 로그인이 가능하다는 장점이 있음. 자동 로그인 시 유저의 정보를 직접적으로 저장하지 않고, Datastore에 토큰을 저장함.
class MainActivity : ComponentActivity() {

    override fun onCreate(savedInstanceState: Bundle?) {
        super.onCreate(savedInstanceState)
        setContent {
            val db = Firebase.database

            val context = LocalContext.current
            val tokenFlow = DataStoreManager.getToken(context).collectAsState(initial = null)
            val autoLoginFlow = DataStoreManager.getAutoLoginStatus(context).collectAsState(initial = null)

            val viewModel: NavUserViewModel =
                viewModel(factory = UserViewModelFactory(UserRepository(db)))
            val noticeViewModel: NavNoticeViewModel =
                viewModel(factory = NoticeViewModelFactory(NoticeRepository(db)))
            val clubViewModel: NavClubViewModel =
                viewModel(factory = ClubViewModelFactory(ClubRepository(db)))
            val navController = rememberNavController()

            var startDestination by remember { mutableStateOf(NavRoutes.Login.route) }

            // 공지사항 notification 생성
            createNotificationChannel(this)
            noticeViewModel.monitorNewNotices(context)

            LaunchedEffect(tokenFlow.value) {
                tokenFlow.value?.let { token ->
                    Log.i("token", "LaunchedEffect:tokenFlow")
                    verifyToken(context, token) { isValid ->
                        if (isValid) {
                            val userId = getUserIdFromToken(token)
                            viewModel.setUserInfo(userId)
                            viewModel.loginStatus.value = true
                            startDestination = NavRoutes.ClubList.route
                        } else {
                            viewModel.loginStatus.value = false
                            startDestination = NavRoutes.Login.route
                        }
                        navController.navigate(startDestination) {
                            if (!isValid) {
                                popUpTo(NavRoutes.Login.route) { inclusive = true }
                            }
                        }
                    }
                }
            }
            MainScreen(
                navController = navController,
                navUserViewModel = viewModel,
                navNoticeViewModel = noticeViewModel,
                navClubViewModel = clubViewModel,
                startDestination = startDestination,
                onLoginSuccess = { token ->
                    lifecycleScope.launch {
                        Log.i("token", "LoginScreen")
                        if (autoLoginFlow.value == true) {
                            DataStoreManager.saveToken(context, token)
                        }
                        viewModel.loginStatus.value = true
                        navController.navigate(NavRoutes.ClubList.route) {
                            popUpTo(NavRoutes.Login.route) { inclusive = true }
                        }
                    }
                    Toast.makeText(context, "Login successful", Toast.LENGTH_SHORT).show()
                }
            )
        }
    }

    private fun getUserIdFromToken(token: String): String {
        val currentUser = FirebaseAuth.getInstance().currentUser
        val uid = currentUser?.uid
        return uid.toString()
    }

    private fun verifyToken(context: Context, token: String, callback: (Boolean) -> Unit) {
        Log.i("token", "verifyToken")
        val verifyTokenRequest = VerifyTokenRequest(token)
        RetrofitClient.instance.verifyToken(verifyTokenRequest).enqueue(object :
            Callback<VerifyTokenResponse> {
            override fun onResponse(call: Call<VerifyTokenResponse>, response: Response<VerifyTokenResponse>) {
                if (response.isSuccessful && response.body()?.message == "Valid JWT") {
                    Toast.makeText(context, "Token is valid", Toast.LENGTH_SHORT).show()
                    callback(true)
                } else {
                    Toast.makeText(context, "Token is invalid", Toast.LENGTH_SHORT).show()
                    callback(false)
                }
            }

            override fun onFailure(call: Call<VerifyTokenResponse>, t: Throwable) {
                Toast.makeText(context, "An error occurred", Toast.LENGTH_SHORT).show()
                callback(false)
            }
        })
    }
}- AWS EC2에서는 node.js 기반 서버들을 관리하는 pm2 모듈로 Express 서버를 무중단 실행함. Express 서버는 /login, /verifyToken, /sendIdToken 엔드포인트를 가지며, 각각 커스텀 토큰 생성, 토큰 유효성 검증, 클라이언트로부터 토큰 수신의 역할을 함. ApiService 인터페이스를 통해 애플리케이션이 해당 서버에 POST 요청을 보낼 수 있음. 네트워크 통신을 위해 Retrofit과 OkHttpClient 등을 함께 사용함.
const admin = require('firebase-admin');
const express = require('express');
const serviceAccount = require('./{서비스계정 json 파일명}.json');  // 실제 파일명 입력

admin.initializeApp({
    credential: admin.credential.cert(serviceAccount)
});

const app = express();
app.use(express.json());

app.get('/login', (req, res) => {
    res.send('<h1>Kuclub 토큰 생성 서버</h1>');
});

app.get('/verifyToken', (req, res) => {
    res.send('<h1>Kuclub 토큰 검증 서버</h1>');
});

// Create JWT
app.post('/login', async (req, res) => {
    const { userId } = req.body;
    console.log('Received login request:', userId);

    try {
        const customToken = await admin.auth().createCustomToken(userId);
        console.log('Sent login response to client');
        res.json({ token: customToken });
    } catch (error) {
        console.log('Error creating custom token:', error);
        res.status(500).send('Internal server error');
    }
});

// Verify JWT
app.post('/verifyToken', async (req, res) => {
    const { token } = req.body;
    console.log(token);
    if (!token) {
        return res.status(401).json({ message: 'Please give the JWT' });
    }

    try {
        const decodedToken = await admin.auth().verifyIdToken(token);
        const uid = decodedToken.uid;
        console.log(uid);
        req.user = uid;
        res.json({ message: 'Valid JWT' });
        console.log('Sent verifyToken response to client');
    } catch (error) {
        console.log(error);
        return res.status(401).json({ message: 'Invalid JWT' });
    }
});

// 서버에게 ID 토큰을 전송하는 엔드포인트 정의
app.post('/sendIdToken', async (req, res) => {
    // 클라이언트로부터 받은 ID 토큰 처리
    const { idToken } = req.body;

    // 예: ID 토큰을 출력하여 확인
    console.log('Received ID token from client:', idToken);

    // 클라이언트에게 응답 반환
    res.json({ success: true, message: 'Received ID token successfully' });
});

const PORT = process.env.PORT || 5000;
app.listen(PORT, () => {
    console.log(`Server running on port ${PORT}`);
});
data class LoginRequest(val userId: String, val password: String)
data class TokenResponse(val token: String)
data class VerifyTokenRequest(val token: String)
data class VerifyTokenResponse(val message: String)
data class IdTokenRequest(val idToken: String)
data class ServerResponse(val success: Boolean, val message: String)
interface ApiService {
@POST("/login")
fun login(@Body request: LoginRequest): Call<TokenResponse>
@POST("/verifyToken")
fun verifyToken(@Body request: VerifyTokenRequest): Call<VerifyTokenResponse>
@POST("/sendIdToken")
fun sendIdToken(@Body request: IdTokenRequest): Call<ServerResponse>
}package com.example.kuclubapp
import okhttp3.OkHttpClient
import okhttp3.logging.HttpLoggingInterceptor
import retrofit2.Retrofit
import retrofit2.converter.gson.GsonConverterFactory
object RetrofitClient {
private const val BASE_URL = "http://3.34.14.100:5000/"
private val logging = HttpLoggingInterceptor().apply {
setLevel(HttpLoggingInterceptor.Level.BODY)
}
private val httpClient = OkHttpClient.Builder()
.addInterceptor(logging)
.build()
private val retrofit = Retrofit.Builder()
.baseUrl(BASE_URL)
.addConverterFactory(GsonConverterFactory.create())
.client(httpClient)
.build()
val instance: ApiService by lazy {
retrofit.create(ApiService::class.java)
}
}설정 페이지
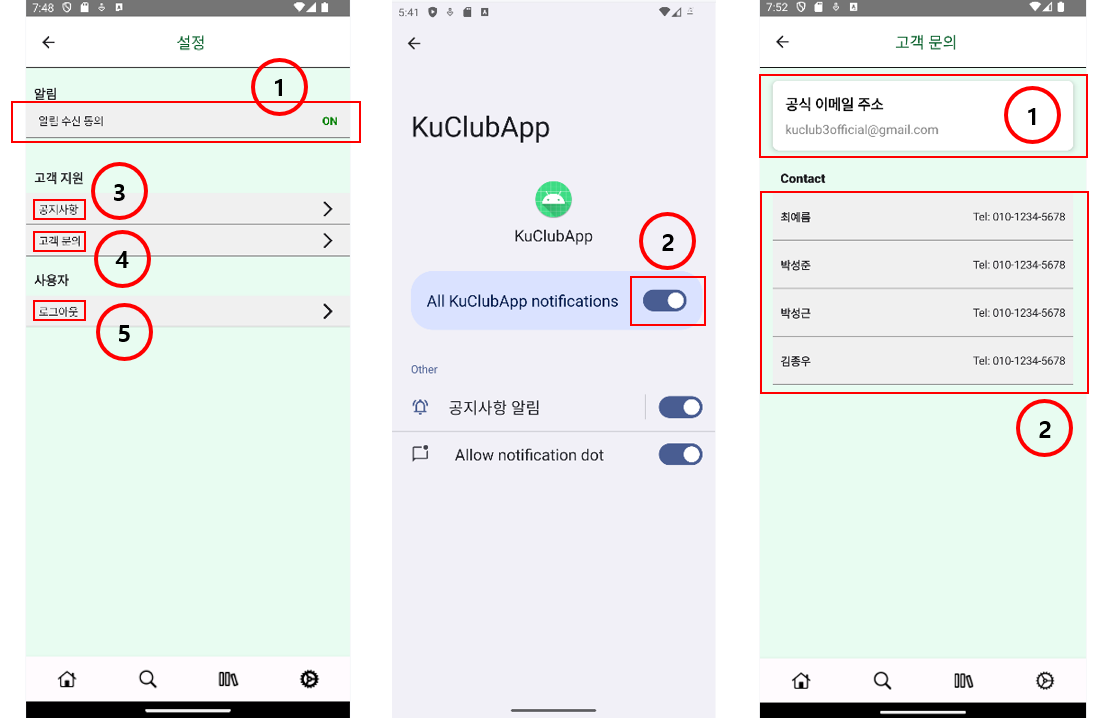
앱 알림 권한 ON/OFF
- rememberPermissionState를 통해 현재 권한 허용 여부에 따라 ON 또는 OFF 텍스트가 표시됨.
val context = LocalContext.current
val permissionState = rememberPermissionState(
    permission = android.Manifest.permission.POST_NOTIFICATIONS)

var notificationsEnabled by remember { mutableStateOf(checkNotificationChannelStatus(context)) }
var alarmEnabled by remember { mutableStateOf(permissionState.status.isGranted) }

val launcher = rememberLauncherForActivityResult(
    contract = ActivityResultContracts.StartActivityForResult()
) {
    notificationsEnabled = checkNotificationChannelStatus(context)
    alarmEnabled = permissionState.status.isGranted
}

LaunchedEffect(Unit) {
    notificationsEnabled = checkNotificationChannelStatus(context)
    alarmEnabled = permissionState.status.isGranted
}

val lifecycleOwner = LocalLifecycleOwner.current
DisposableEffect(lifecycleOwner) {
    val observer = LifecycleEventObserver { _, event ->
        if (event == Lifecycle.Event.ON_RESUME) {
            notificationsEnabled = checkNotificationChannelStatus(context)
            alarmEnabled = permissionState.status.isGranted
        }
    }
    lifecycleOwner.lifecycle.addObserver(observer)
    onDispose {
        lifecycleOwner.lifecycle.removeObserver(observer)
    }
}
fun checkNotificationChannelStatus(context: Context): Boolean {
if (Build.VERSION.SDK_INT >= Build.VERSION_CODES.O) {
val manager = context.getSystemService(Context.NOTIFICATION_SERVICE) as NotificationManager
val channel = manager.getNotificationChannel("Notice_Notification")
return channel?.importance != NotificationManager.IMPORTANCE_NONE
}
return true
}Text(
text = if (notificationsEnabled && alarmEnabled) "ON" else "OFF",
fontWeight = FontWeight.Bold,
color = if (notificationsEnabled && alarmEnabled) Color(0xFF008000) else Color.Red,
modifier = Modifier.padding(horizontal = 16.dp)
)- 알림 수신 동의 바를 클릭하면 앱 설정 화면으로 이동하며, 공지사항 알림 권한에 대한 ON/OFF를 설정 가능함.
NotificationSettings(notificationsEnabled, alarmEnabled) {
    val intent = Intent(Settings.ACTION_APP_NOTIFICATION_SETTINGS).apply {
        putExtra(Settings.EXTRA_APP_PACKAGE, context.packageName)
        putExtra(Settings.EXTRA_CHANNEL_ID, "Notice_Notification")
    }
    launcher.launch(intent)
}
고객 문의
- 앱 공식 이메일 주소와 개발자 연락처를 확인할 수 있음.
로그아웃
- 로그아웃 버튼을 클릭하면 DataStore에서 JWT가 삭제되면서, 로그인 상태가 해제됨.
SupportOption(
    label = "로그아웃",
    onClick = {
        navUserViewModel.viewModelScope.launch {
            navUserViewModel.deleteToken(context)
            navUserViewModel.loginStatus.value = false
            navController.navigate(NavRoutes.Login.route)
        }
    }
)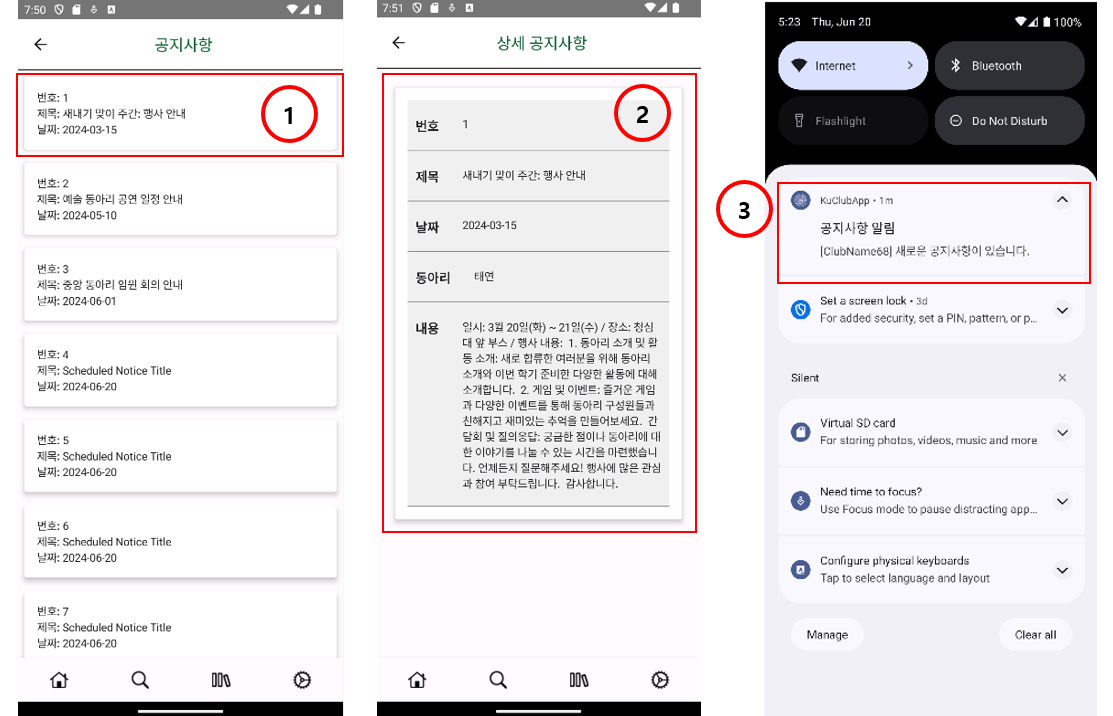
공지사항
- 공지사항 목록에서 상세 페이지로 이동할 때, 선택한 공지사항 객체의 noticeNum을 함께 전달하여 선택한 공지사항의 내용이 나오도록 함.
LazyColumn(
    modifier = Modifier.fillMaxSize()
) {
    itemsIndexed(notices) { index, notice ->
        NoticeListItem(notice = notice, onClick = {
            navController.navigate("NoticeDetail/${notice.noticeNum}")
        })
    }
}- AWS EC2의 Crontab에서 일정한 주기로 Firebase DB에 Notice 데이터를 추가하는 node.js 코드를 실행함. 새로운 공지사항이 추가되면 해당 내용이 포함된 알림을 트리거 함.
const admin = require('firebase-admin');
const serviceAccount = require('./{서비스계정 json 파일명}.json');  // 실제 파일명 입력
var moment = require('moment-timezone');

admin.initializeApp({
  credential: admin.credential.cert(serviceAccount),
  databaseURL: '{Firebase Realtime Database 주소를 입력하시오}'
});

const db = admin.database();
const noticeRef = db.ref('/KuclubDB/Notice');
console.log(noticeRef)

async function addNotice() {
  const snapshot = await noticeRef.once('value');
  const notices = snapshot.val();
  let noticeNum = 1;

  var today = moment().tz('Asia/Seoul');
  var year = today.format('YYYY');
  var month = today.format('MM');
  var day = today.format('DD');
  var dateString = year + '-' + month + '-' + day;

 if (notices) {
    const noticeKeys = Object.keys(notices);
    const lastNoticeKey = noticeKeys[noticeKeys.length - 1];
    const lastNotice = notices[lastNoticeKey];
    noticeNum = lastNotice.noticeNum + 1;
  }

  const newNotice = {
    noticeContent: "This is a scheduled notice content.",
    noticeDt: dateString,
    noticeNum: noticeNum,
    noticeTitle: "Scheduled Notice Title"
  };

  await noticeRef.child(noticeNum.toString()).set(newNotice);

  console.log('New notice added with number:', noticeNum);
}

addNotice().catch(console.error);
suspend fun insertNotice(notice: Notice, context: Context){
var table = firebaseDB.getReference("KuclubDB/Notice")
var noticeInfo = table.child(notice.noticeNum.toString()).setValue(notice)
sendNoticeNotification(context, notice.clubName,"새로운 공지사항이 있습니다.")
}
private var initialDataLoaded = false
private var lastProcessedNoticeId = 0
fun monitorNewNotices(context: Context) {
val table = firebaseDB.getReference("KuclubDB/Notice")
table.addValueEventListener(object : ValueEventListener {
override fun onDataChange(dataSnapshot: DataSnapshot) {
dataSnapshot.children.forEach { noticeSnapshot ->
val notice = noticeSnapshot.getValue(Notice::class.java)
notice?.let {
if (!initialDataLoaded) {
lastProcessedNoticeId = notice.noticeNum
} else {
if (notice.noticeNum > lastProcessedNoticeId) {
sendNoticeNotification(context, notice.clubName, "새로운 공지사항이 있습니다.")
lastProcessedNoticeId = notice.noticeNum
}
}
}
}
initialDataLoaded = true
}
override fun onCancelled(databaseError: DatabaseError) {
Log.e(TAG, "Failed to read data:", databaseError.toException())
}
})
}APK 파일 배포
- 안드로이드 스튜디오 Build 메뉴 > Generate signed App Bundle / APK
- APK 선택
- Create New 클릭 > New Folder 생성 > Keystore File name 입력 (jks 파일) > 새로운 Keystore 생성 (패스워드 입력, Alias에 key0 입력, First and Last Name, Organization, Country Code [한국: kr] 입력)
- Build Variants 옵션에서 release 선택
- 프로젝트 폴더 > app > release 경로에 생성된 apk 파일 확인
- Release key 생성 후, 1~5 다시 진행
Release key 생성 방법: Terminal에 아래 커맨드 입력
keytool -list -v -keystore c:/users/(... 파일 경로 ...)/{Keystore 파일명}.jks -alias key0최종 결과물
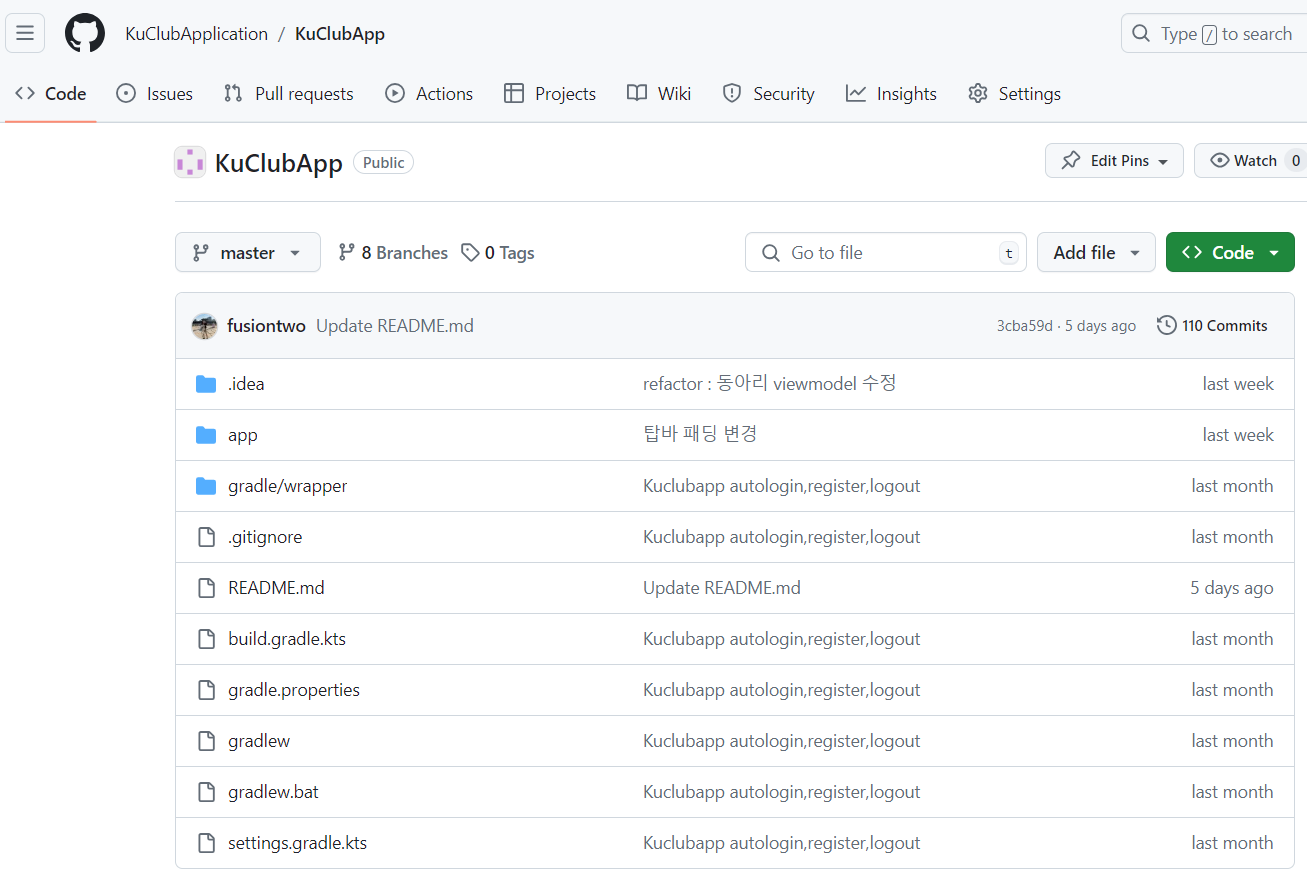
프로젝트를 마무리하는 단계에서 정리는 매우 중요한 것 같다. 소스코드만 덩그러니 있을 때보다, 최종보고서를 정리하면서 만든 기능들과 구현 방식을 되돌아볼 수 있었다. 최종 결과물로는 소스코드와 협업 기록이 기록된 깃허브 레포지토리, 최종보고서, 발표자료, 앱 배포 apk 파일, 팀 활동 평가를 정리하였다.