
2025. 1. 8. 02:34ㆍProject Log/학부 졸업프로젝트
Amazon Lex?
지난주에는 flutter 앱에서 음성을 입력받아 전달하면, 서버에서 whisper 모델을 통해 텍스트로 변환하는 작업을 주로 했다. 이번 주는 AWS Lex와 GPT 모델을 사용하여, 사용자 입력과 적절한 상호작용을 하는 대화 설계 작업을 할 것이다.
우선 복잡한 대화 설계까지 고려하지는 않고, 기본 모듈을 만든다는 생각으로 진행할 예정이다.
Amazon Lex는 애플리케이션에서 AI 챗봇과 음성 봇을 설계, 구축, 테스트, 배포하기 위해 고급 자연어 모델을 사용하는 완전 관리형 인공지능 서비스이다. Amazon Lex를 파운데이션 모델 및 대규모 언어 모델과 통합하면 기업 지식 리포지토리의 데이터를 사용하여 복잡한 질문에 답할 수 있다.
출처: https://aws.amazon.com/ko/lex/#

Amazon Lex 참고 링크
Lex에 대해 알아갈 수 있는 사이트부터 찾았다.
1번. Lex가 무엇인지, 간단한 아키텍처와 함께 설명한다.
Amazon Lex 공식 페이지: https://aws.amazon.com/ko/lex/
2번. Lex V2 튜토리얼 프로젝트가 있고, 프로그래밍 언어 또는 플랫폼에 맞게 조정된 API 메뉴얼도 있다.
Amazon Lex 시작하기 안내서: https://aws.amazon.com/ko/lex/getting-started/
3번. Lex V2의 상세 정보가 카테고리로 깔끔하게 정리되어 있다.
Amazon Lex 개발자 가이드: https://docs.aws.amazon.com/ko_kr/lexv2/latest/dg/lambda.html
[ Amazon Lex V2 시작하기: 뱅킹 봇 생성 ] 실습
2번 링크에서 Lex V2와 Lambda의 중요한 포인트를 배울 수 있고 설명이 친절한 프로젝트 자습서를 발견했다. 계좌 잔고 확인, 청구서 지불, 자금 이체 요청을 다룰 수 있는 뱅킹 봇을 만든다.
Amazon Lex V2 시작하기: 뱅킹 봇 생성
https://aws.amazon.com/ko/tutorials/create-banking-bot-on-amazon-lex-v2-console/
Create a BankingBot with support for English and Spanish on the Amazon Lex V2 console
Close Thank you for your feedback Feedback helps us improve our experience. If you would like to share more details on the feedback, please click the feedback button below.
aws.amazon.com
Lex V2 대화 인터페이스 구축을 위한 주요 개념
🌏 Intent (의도)
사용자가 수행하고자 하는 동작을 나타낸다. 챗봇은 1개 또는 여러 개의 관련 Intent를 지원할 수 있다.
🌏 Utterance (발화)
Intent를 활성화시키는 문구이다. 각 Intent는 샘플 발화 세트를 제공하여 학습시킬 수 있고, Lex가 이러한 샘플을 바탕으로 사용자 입력의 의도를 식별한다.
🌏 Slots (슬롯)
챗봇이 요청된 작업을 완료하거나 의도를 실행하기 위해 필요로 하는 입력 데이터이다.
- Built-in slots: 데이터가 인식되고 처리되는 방식을 정의한다. Lex의 built-in slot type 예시로는 AMAZON.DATE가 있다. 날짜를 나타내는 단어나 구를 인식하여, 표준 날짜 형식으로 변환한다.
- Custom slots: 값 목록을 제공하여, 사용자가 직접 정의하고 관리할 수 있는 슬롯이다. Lex는 사용자가 제시한 값 목록을 모델에 학습시켜 슬롯 유형을 인식할 수 있게 한다. accountType이라는 슬롯 유형을 정의하고, 값으로 Checking, Savings, Credit을 추가할 수 있다.
🌏 Prompts (프롬프트 메시지)
정보를 얻거나, 사용자의 발언을 확인하거나, 거래를 완료하기 전에 동작을 확인하기 위한 챗봇 메시지이다.
🌏 Fulfillment (이행)
사용자의 요청을 완료하는 과정에서 봇이 마무리 응답을 제공하도록 구성할 수 있다. AWS Lambda 함수와 같은 Code Hook을 활성화하여 비즈니스 로직을 수행하도록 할 수도 있다.

챗봇 생성하기
[Create bot] 을 누른다.

Creation method - [Create a blank bot] 을 누른다.

Bot configuration - [Bot name] & [Description] 을 입력한다.

IAM permissions - Runtime role - [Create a role with basic Amazon Lex permissions.] 를 누른다.

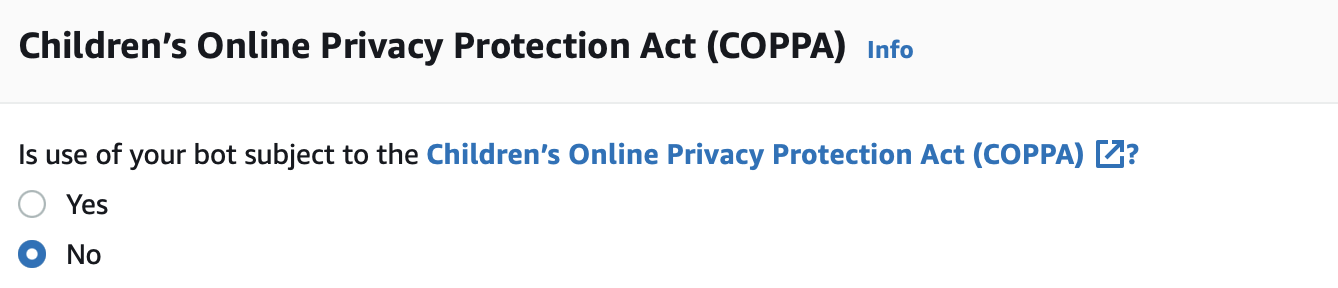
COPPA 적용 여부 - [No] 를 누른다.
Idle session timeout은 기본 설정을 유지하며, [Next]를 누른다.

Language - Select language - [English (US)] 선택 & Voice interaction - [Danielle]을 선택한다. 매우 다양한 Voice를 선택할 수 있다. [Add another language] 를 클릭한다.

Select language - [Korean (KR)] 선택 - [Done]을 클릭한다. voice에 다른 옵션들도 있었지만, 일단 가이드대로 기본 설정을 유지했다.

BankingBot에 새로운 Intent가 추가된 것을 볼 수 있다.

Intent를 구성하기에 앞서, Intent 이행을 위한 Lambda function을 생성한다. [새로 작성] 선택 - 함수 이름 작성 - 런타임 [Python 3.12] 선택 - [함수 생성] 을 클릭한다.

생성된 람다 함수와 기본 생성된 lambda_function.py 코드를 볼 수 있다.
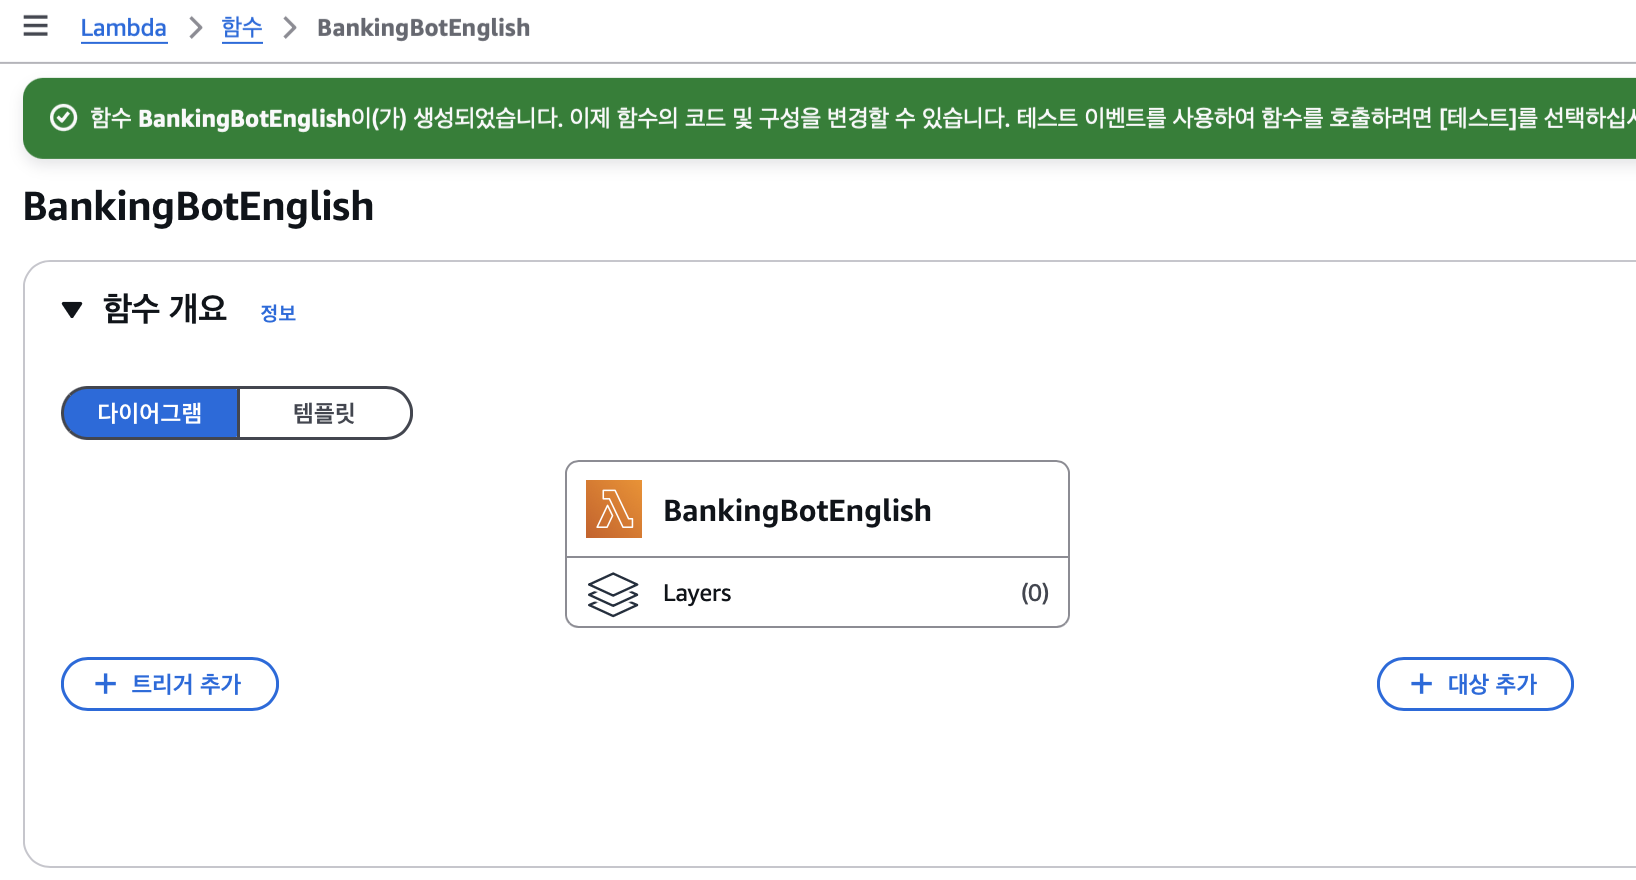

기존 코드를 모두 지우고, AWS에서 제공하는 BankingBotEnglish 코드를 다운로드하여 에디터에 붙여 넣는다. [Deploy]를 클릭한다.
import json
import random
import decimal

def random_num():
    return(decimal.Decimal(random.randrange(1000, 50000))/100)

def get_slots(intent_request):
    return intent_request['sessionState']['intent']['slots']

def get_slot(intent_request, slotName):
    slots = get_slots(intent_request)
    if slots is not None and slotName in slots and slots[slotName] is not None:
        return slots[slotName]['value']['interpretedValue']
    else:
        return None

def get_session_attributes(intent_request):
    sessionState = intent_request['sessionState']
    if 'sessionAttributes' in sessionState:
        return sessionState['sessionAttributes']

    return {}

def elicit_intent(intent_request, session_attributes, message):
    return {
        'sessionState': {
            'dialogAction': {
                'type': 'ElicitIntent'
            },
            'sessionAttributes': session_attributes
        },
        'messages': [ message ] if message != None else None,
        'requestAttributes': intent_request['requestAttributes'] if 'requestAttributes' in intent_request else None
    }


def close(intent_request, session_attributes, fulfillment_state, message):
    intent_request['sessionState']['intent']['state'] = fulfillment_state
    return {
        'sessionState': {
            'sessionAttributes': session_attributes,
            'dialogAction': {
                'type': 'Close'
            },
            'intent': intent_request['sessionState']['intent']
        },
        'messages': [message],
        'sessionId': intent_request['sessionId'],
        'requestAttributes': intent_request['requestAttributes'] if 'requestAttributes' in intent_request else None
    }

def CheckBalance(intent_request):
    session_attributes = get_session_attributes(intent_request)
    slots = get_slots(intent_request)
    account = get_slot(intent_request, 'accountType')
    #The account balance in this case is a random number
    #Here is where you could query a system to get this information
    balance = str(random_num())
    text = "Thank you. The balance on your "+account+" account is $"+balance+" dollars."
    message =  {
            'contentType': 'PlainText',
            'content': text
        }
    fulfillment_state = "Fulfilled"
    return close(intent_request, session_attributes, fulfillment_state, message)

def FollowupBalance(intent_request):
    session_attributes = get_session_attributes(intent_request)
    slots = get_slots(intent_request)
    account = get_slot(intent_request, 'accountType')
    #The account balance in this case is a random number
    #Here is where you could query a system to get this information
    balance = str(random_num())
    text = "Thank you. The balance on your "+account+" account is $"+balance+" dollars."
    message =  {
            'contentType': 'PlainText',
            'content': text
        }
    fulfillment_state = "Fulfilled"
    return close(intent_request, session_attributes, fulfillment_state, message)


def dispatch(intent_request):
    intent_name = intent_request['sessionState']['intent']['name']
    response = None
    # Dispatch to your bot's intent handlers
    if intent_name == 'CheckBalance':
        return CheckBalance(intent_request)
    elif intent_name == 'FollowupBalance':
        return FollowupBalance(intent_request)

    raise Exception('Intent with name ' + intent_name + ' not supported')

def lambda_handler(event, context):
    response = dispatch(event)
    return response
BankingBot > Deployment > Aliases 탭에 들어가서, [TestBotAlias]를 클릭한다.

조금 전에 생성한 람다 함수와 매칭되는 [English (US)]를 클릭한다.

람다 함수를 등록한다. Source - [BankingBotEnglish] 선택 & Lambda function version or alias - [$LATEST]를 선택한다.

영문 Intent 추가
사용자가 금융 기관과 상호작용을 할 수 있도록 해주는 Intent와 English (US) Slot을 추가한다.
- Welcome: 사용자에게 인사한다.
- CheckBalance: 2개의 슬롯(accountType, dateofBirth)으로부터 입력 데이터를 참고하여, 계좌의 잔고를 확인한다.
- FollowupBalance: 2개의 슬롯(accountType, dateofBirth)으로부터 입력 데이터를 참고하여, 계좌에서 일정 기간 이루어진 거래 내역을 제공한다.
- TransferFunds: 3개의 슬롯(sourceAccountType, targetAccountType, transferAmount)으로부터 입력 데이터를 참고하여, 계좌 간 자금을 이체한다.
- FallbackIntent: 다른 Intent와 일치하는 사용자 입력이 있으면, 기본 응답을 제공한다.
🌼 Welcome Intent 추가
Lex BankingBot의 English (US) > Intents 탭으로 이동한다. [NewIntent]를 클릭한다.

Intent details - Intent name을 'Welcome'으로 수정한다.

Sample utterances - Utterances에 해당하는 단어와 구를 텍스트 박스에 적기 - [Add utterance] 클릭한다.

Closing response 토글 [Active]로 활성화 - Message group - 'Hi! I'm BB, the BankingBot. How can I help you today?'를 추가한다.

[Build] 클릭 - [Test] 클릭 - 테스트 메시지를 입력하고 응답을 확인한다.
Utterances에 추가했던 단어와 문장을 입력해 보았고, Closing response에 등록한 메시지로 응답하는 것을 확인했다.

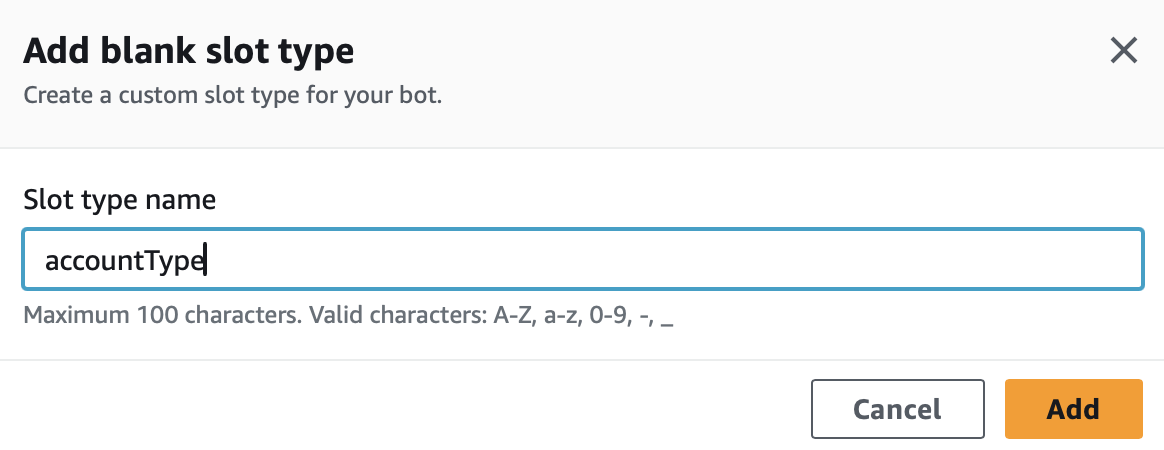
🌼 CheckBalance Intent 추가
Lex BankingBot의 English (US) > Slot types 탭으로 이동한다. Add blank slot type - 'accountType'을 추가한다.

Slot type name - 'accountType' 입력 - [Add]를 한다.
[accountType] 클릭하여 Slot type 에디터 페이지 이동 - Slot value resolution - [Restrict to slot values]를 선택한다.

Slot type values - 슬롯값 추가 - [Save Slot type] 을 클릭한다.

Lex BankingBot의 English (US) > Intents 탭으로 이동한다. [Add intent] 클릭 - [Add empty intent]를 클릭한다.

'CheckBalance' Intent를 추가한다.

Output contexts 목록에서 'CheckBalance' Intent를 선택한다. Input contexts에서는 'CheckBalance' 를 제거한다.

Sample utterances - Plain text - utterances 를 여러 개 추가한다.

Slots - Add slot - (accountType 슬롯 추가) Name, Slot type, Prompts를 입력한다.

Slots - Add slot - (dateofbirth 슬롯 추가) Name, Slot type, Prompts를 입력한다.

slots가 추가된 것을 볼 수 있다.

Contexts - Input contexts - [New Context tag] 클릭

Add new context tag - 'contextCheckBalance' 추가

Fulfillment - 토글 [Active] 활성화 - [Save Intent] 를 클릭한다.

[Build] 클릭 - [Test] 클릭 - Utterances에 등록한 문장 입력 후, Lex의 질문에 답변하며 슬롯값 데이터를 제공한다.
Custom slot인 'accountType'에 추가했던 Slot type values 중 하나인 'savings'를 입력하면 의도를 파악하고 다음 질문을 던진다. Built-in slot인 'Amazon.Date'에 부합하는 날짜 정보를 입력하면 의도를 파악하여 잔고를 알려준다.


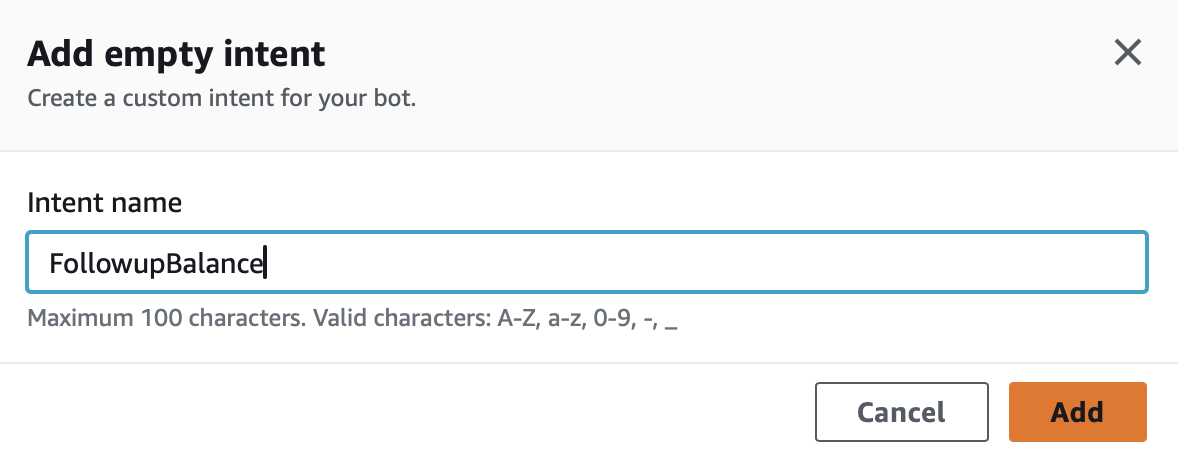
🌼 FollowupBalance Intent 추가
반복되는 단계는 조금씩 요약해서 기록하겠다.
Lex BankingBot의 English (US) > Intents 탭으로 이동한다. [Add intent] 클릭 - [Add empty intent]를 클릭 - 'FollowupBalance' 추가를 한다.
Intent details - Description을 기록해도 된다.

Context - Input context - 'contextCheckBalance'를 추가한다.

Sample Utterances - Plain Text 탭 - Utterances를 추가한다.

Slots - 'accountType' 슬롯 추가, Slot type 지정, Prompts를 입력한다.

Slots - 'dateofBirth' 슬롯 추가, Slot type 지정, Prompts를 입력한다.

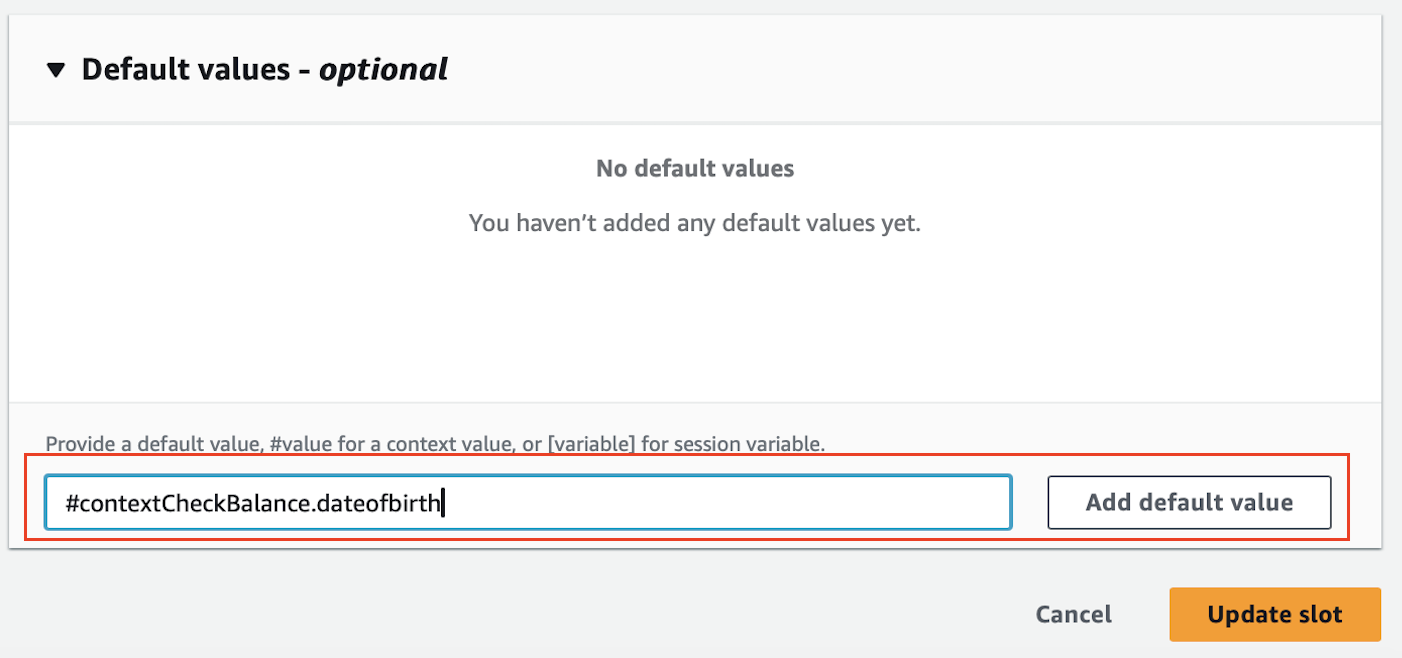
'dateofBirth' 슬롯 - Advanced options 클릭 - '#contextCheckBalance.dateofBirth' 입력 - [Add default value] 클릭 - [Update slot]을 클릭한다.
*** 주의사항: Advanced options 설정을 할 때, CheckBalance Intent에서 생성한 'dateofbirth'라는 slot Name을 적어야 한다. 맨 처음에 공식 페이지에 'dateofBirth'라고 나와 있어서 그대로 적었다가, 챗봇이 생년월일을 기억하지 못하고 매번 다시 물어보는 문제가 생겼다. 'dateofBirth'는 FollowupBalance의 slot Name이다.

Fulfillment - 토글 [Active] 활성화 - [Save Intent] 클릭

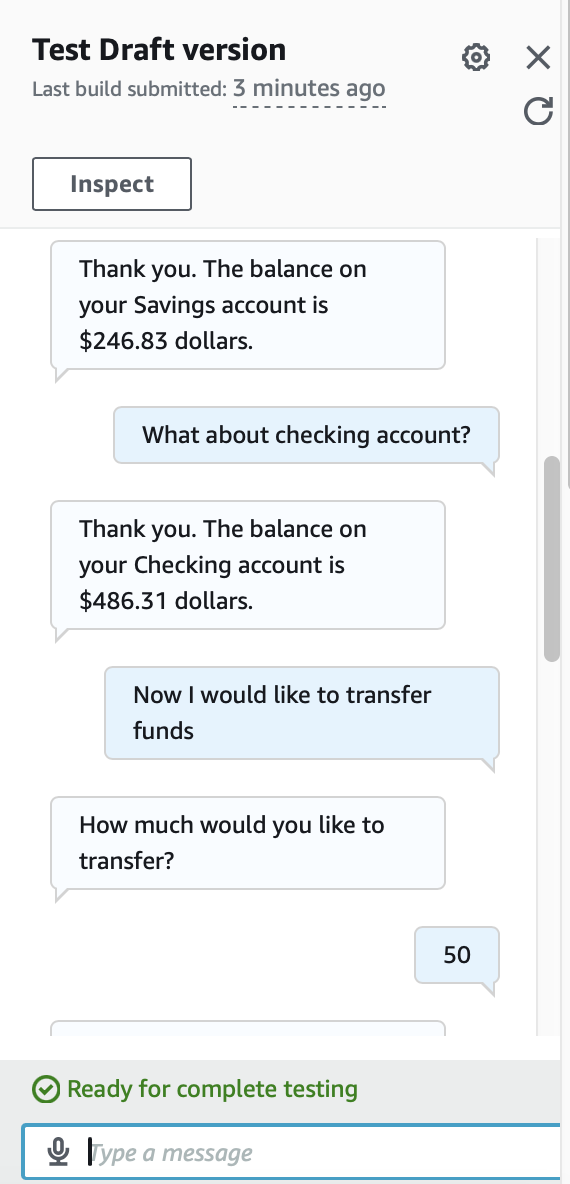
[Build] 클릭 - [Test] 클릭 - Utterances에 등록한 문장 입력 후, Lex의 질문에 답변하며 슬롯값 데이터를 제공한다.
여기서 중요한 포인트는 챗봇이 생년월일을 한 번 입력받은 후에는 다시 인증을 요구하지 않고, 특정 계좌의 정보를 제공한다는 것이다.

🌼 TransferFunds Intent 추가
Lex BankingBot의 English (US) > Intents 탭으로 이동한다. [Add intent] 클릭 - [Add empty intent]를 클릭 - 'TransferFunds'를 추가한다.

Intent details - Description을 기록해도 된다.

Sample Utterances - Plain Text 탭 - Utterances를 추가한다.

Slots - 'transferAmount' 슬롯 추가, Slot type 지정, Prompts를 입력한다.

Slots - 'sourceAccountType' 슬롯 추가, Slot type 지정, Prompts를 입력한다.

Slots - 'targetAccountType' 슬롯 추가, Slot type 지정, Prompts를 입력한다.

Confirmation 토글 [Active] 활성화 - Confirmation prompt에 'Got it. So we are transferring {transferAmount} from {sourceAccountType} to {targetAccountType}. Can I go ahead with the transfer?' 입력 - Decline response에 'The transfer has been cancelled.' 를 입력한다.

Closing response - Message에 'The transfer is complete. {transferAmount} should now be available in your {targetAccountType} account.'를 입력 - [Save Intent]를 클릭한다.

🌼 FallbackIntent Intent 추가
기본으로 생성되어 있는 FallbackIntent를 클릭 - Closing Response에 'Sorry I am having trouble understanding. I can help you find your account balance, transfer funds, and make a payment.'를 추가 - [Save Intent]를 클릭한다.

챗봇 테스트
BankingBot의 Language: English (US) 경로에서 [Build] 클릭 - [Test] 클릭 후, 지금까지 생성한 Intent가 정상적으로 작동하는지 채팅 테스트를 진행했다. 생성했던 Intent 설정대로 채팅이 이루어지는 모습이다.


Conversation flows
Analytics > Conversation dashboard > Conversation flows 탭에서 대화 흐름과 실행된 퍼센티지를 확인할 수 있다.
아래 그림에 보면 FallbackIntent 비율이 꽤 커 보이는데, 이는 Intent를 추가하고 테스트하는 과정에서 시행착오가 많이 있었기 때문이다. 사소하지만 slot name의 대소문자나, context 관리, 각종 옵션을 꼼꼼히 검토해야 한다.

프로젝트 깔끔하게 삭제하기
- Lex V2 Console - BankingBot 선택 - Action, Delete 클릭 - 확인 창에서 Delete 클릭
- Lambda Console - BankingBotEnglish 람다 함수 선택 - Action, Delete 클릭 - 확인 창에서 Delete 클릭